Mods[]
Most mods for Battle Brothers can be found at Nexus Mods or Mod DB.
Modding[]
Modding is the process of modifying files to change the gameplay.
The mod kit[]
Battle Brothers doesn't have official modding tools. Rather, modders use Adam Milazzo's mod kit to decrypt and decompile the game scripts.
Accessing the files[]
This is a step-by-step tutorial for Windows.
- Extract the contents of the game 'data_001' archive with a file archiver like 7zip
- Download and extract the kit
- Open a command prompt (type 'run' in the Windows search bar and enter), then type 'cmd'
- Go to the kit bin directory by typing 'cd .../bbros/bin', where '...' is a path to the directory where you extracted the kit (use 'cd /d' instead of just 'cd' if the kit is located on another drive than the current one)
- Type in 'massdecompile.bat .../data_001/scripts' where '...' is a path to the directory where you extracted 'data_001'
The scripts are now decompiled and can be opened, read and edited with a text editor. Notepad++ can add the 'data_001' folder as a workspace which comes handy for navigation and folder wide searches.
Adding new asset[]
The mod kit includes bbrusher, a program that can pack images into sprite sheets and create brushes. This is a step-by-step tutorial using the More Named Weapons mod as an example.
- Access the bin folder of the mod kit following the guidelines of the Accessing the files section
- Optionally, unpack the game assets with this command:
bbrusher unpack brush, where 'brush' is the full path (including the directory) to a brush ending with the brush name, for example: entity_icons.brush (weapons). The brush sprite sheet (for example, entity_icons.png) must be present somewhere in the parent folder (preferably use the data_001 structure to avoid any issues). - Create the assets

- from scratch
- from the game assets
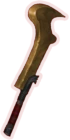
- Create inventory icons (north east orientation)
- A 70 x 70 (pixels) stash icon
- A large 70 x 140 (pixels) character window icon
- Create icons for the tactical (combat) screen
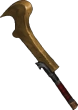

Orientation is north west for two-handed weapons, north east for one-handed weapons. Image size should stay close to the size of similar base game weapons (see 2. to unpack sprites).
- A normal version
- A bloodied version
- Create a metadata.xml file for the brush (example)
- Add brush tags, specifying a name and version 17 (this number could change with updates)
<brush name="gfx/entity_icons_abel.png" version="17">...</brush>
- Insert sprites inside the brush tags (replace the '...')
<sprite id="icon_named_crypt_cleaver_01" offsetY="35" ic="FF374554" width="130" height="142" img="icons/icon_named_crypt_cleaver_01.png" left="-65" right="13" top="-56" bottom="54" />
<sprite id="icon_named_crypt_cleaver_01_bloodied" offsetY="35" ic="FF29344E" width="130" height="142" img="icons/icon_named_crypt_cleaver_01_bloodied.png" left="-65" right="13" top="-56" bottom="54" />
- 'id' is the unique identifier used to refer to the icon
- 'ic' has no know application; it could refer to a color; use a similar weapon ic
- 'img' is the icon path inside the folder where metadata.xml is located
- 'offsetY' is an offset on the Y (vertical) axis; modifying it will change the asset elevation
- 'left', 'right', 'top', 'bottom' are relative positions; use a similar weapon position; the intervals must equal the image size (in pixels) otherwise bbrusher will return an error
- Add brush tags, specifying a name and version 17 (this number could change with updates)
- Create the brush with this command:
bbrusher pack brush directory, where 'brush' is the name of a brush, for example: entity_icons_abel.brush and 'directory' the folder path to where metadata.xml is stored - Add the generated sprite sheet to 'preload/on_running.txt'
gfx/entity_icons_abel.png - Create a new file for the asset if required, using a similar file as a template and input the new values
- file object name
this.named_crypt_cleaver - ID
"weapon.named_crypt_cleaver" - Name
"Named Crypt Cleaver" - IconLarge (full path to file)
"weapons/melee/named_crypt_cleaver_01_70x140.png" - Icon (full path to file)
"weapons/melee/named_crypt_cleaver_01_70x70.png" - ArmamentIcon (unbloodied version id)
"icon_named_crypt_cleaver_01" - and other variables if necessary
- file object name
- Assign the asset to an entity if necessary
For example, modify the
assignRandomEquipment()function inside 'scripts/entity/tactical/enemies/skeleton_heavy.nut' by inserting this line:this.m.Items.equip(this.new("scripts/items/weapons/named/named_crypt_cleaver"));so that Ancient Legionaries will show with the new weapon. - Move everything in its correct location (inside the Battle Brothers data folder)
Optionally, an archive can regroup all files and folders.
- Brushes in the 'brushes' folder
- Sprite sheets in the 'gfx' folder
- Melee weapon inventory icons in the 'gfx/ui/items/weapons/melee' folder
- Named weapon files in the 'scripts/items/weapons/named' folder
- Enemy files in the 'scripts/entity/tactical/enemies' folder
- And so on for other files, respecting the base folder structure and file location
Tutorials[]
- Battle Brothers Modding Tutorial by LordMidas (work in progress)
- How to unpack the game files the easy and neat way by TaroEld
- Mod hooks tutorial by TaroEld
- Debug Mode Tool by Vilain Joueur (Documentation Link)